
Ubuntu DNS 配置完全指南
前言
Ubuntu 从 17.10 版本开始,DNS 配置机制发生了一次重大变革,引入 systemd-resolved 作为默认的 DNS 解析服务。这套新机制与传统的 /etc/resolv.conf 方式有很大不同,初次接触时容易感到困惑。
本文将从实际文件出发,系统性地解释 Ubuntu 的 DNS 配置机制,并结合 WireGuard VPN 场景下的真实配置案例进行说明。
一、传统方式 vs Ubuntu 方式
1.1 传统 Linux DNS 配置
在传统 Linux 系统中,DNS 配置非常简单:
# /etc/resolv.conf
nameserver 8.8.8.8
nameserver 114.114.114.114
所有应用程序的 DNS 查询都直接发给 8.8.8.8。
特点:
- 配置简单直接
- 只有一个配置文件
- 所有程序共用一套 DNS
缺点:
- 多网卡(Wi-Fi/有线/VPN)切换时,DNS 配置互相覆盖
- 无法实现域名分流(内网域名走内网 DNS,公网域名走公网 DNS)
- 不支持 mDNS(.local 域名解析)
1.2 Ubuntu 的 DNS 配置(systemd-resolved)
Ubuntu 引入了一套更复杂的机制,核心组件是 systemd-resolved。
# /etc/resolv.conf(实际是软链接)
nameserver 127.0.0.53
所有应用程序的 DNS 查询都先发给 127.0.0.53,由 systemd-resolved 服务决定转发给谁。
特点:
- 按网卡独立管理 DNS
- 支持域名分流
- 统一 DNS 缓存
- 原生支持 mDNS 和 LLMNR
二、核心概念详解
2.1 /etc/resolv.conf 到底是什么?
执行 ls -l /etc/resolv.conf:
/etc/resolv.conf -> ../run/systemd/resolve/stub-resolv.conf它不是一个真正的配置文件,而是指向 /run/systemd/resolve/stub-resolv.conf 的软链接。
查看实际内容:
cat /etc/resolv.conf# This is /run/systemd/resolve/stub-resolv.conf managed by man:systemd-resolved(8).
# Do not edit.
#
# This file might be symlinked as /etc/resolv.conf. If you're looking at
# /etc/resolv.conf and seeing this text, you have followed the symlink.
#
# This is a dynamic resolv.conf file for connecting local clients to the
# internal DNS stub resolver of systemd-resolved. This file lists all
# configured search domains.
#
# Run "resolvectl status" to see details about the uplink DNS servers
# currently in use.
#
# Third party programs should typically not access this file directly, but only
# through the symlink at /etc/resolv.conf. To manage man:resolv.conf(5) in a
# different way, replace this symlink by a static file or a different symlink.
#
# See man:systemd-resolved.service(8) for details about the supported modes of
# operation for /etc/resolv.conf.
nameserver 127.0.0.53
options edns0 trust-ad
search .三行配置的含义:
| 配置项 | 含义 |
|---|---|
nameserver 127.0.0.53 | DNS 查询发往本地 127.0.0.53(systemd-resolved 服务) |
options edns0 trust-ad | 启用 EDNS0 协议扩展和 DNSSEC 信任锚 |
search . | 搜索域为根域,不追加任何域名后缀 |
关键结论: 这个文件只是一个”路牌”,告诉系统”DNS 查询请去 127.0.0.53″。真正的 DNS 配置在别处。
文件开头的所有 # 注释都在强调一件事:不要编辑这个文件。
2.2 127.0.0.53 是什么?
127.0.0.53 是 systemd-resolved 服务监听的本地地址。
ss -tuln | grep 127.0.0.53udp UNCONN 0 0 127.0.0.53%lo:53 0.0.0.0:*
tcp LISTEN 0 4096 127.0.0.53%lo:53 0.0.0.0:*它不指向任何物理网卡,而是指向一个运行在系统本地的服务。

2.3 systemd-resolved 是什么?
systemd-resolved 是 Ubuntu 系统的 DNS 解析核心服务,它负责:
- 接收 DNS 查询:监听
127.0.0.53:53,接收所有应用程序的 DNS 请求 - 按规则转发:根据各网卡的 DNS 配置,决定查询转发给哪个上游 DNS
- DNS 缓存:缓存解析结果,加速重复查询
- 域名分流:支持不同域名走不同 DNS 服务器
查看服务状态:
systemctl status systemd-resolved2.4 resolvectl 是什么?
resolvectl 是管理 systemd-resolved 的命令行工具。
resolvectl status这个命令会显示当前所有网卡的 DNS 配置状态。
2.5 DNS Domain 是什么?
DNS Domain 是 systemd-resolved 中一个重要的概念,它决定了哪些域名的查询走该网卡的 DNS。
| 值 | 含义 |
|---|---|
~. | 所有域名都走该网卡的 DNS |
~example.com | 只有 example.com 及其子域名走该网卡 DNS |
~internal | 只有 internal 域名走该网卡 DNS |
| 空 | 只有明确指定的域名走该网卡 DNS |
~. 就像一个通配符,匹配所有域名。
2.6 这个 ~. 是谁加的?
当你在 WireGuard 配置文件 wg0.conf 的 [Interface] 段中写了 DNS = 1.1.1.1 时,wg-quick up 脚本会自动执行:
resolvectl dns wg0 1.1.1.1 2606:4700:4700::1111 223.5.5.5 2400:3200::1
resolvectl domain wg0 "~."   # ← 自动加上这一条
所以 DNS Domain: ~. 是 wg-quick 自动添加的,不是手动配置的。
三、网卡 DNS 配置的完整流程
3.1 应用程序发起 DNS 查询
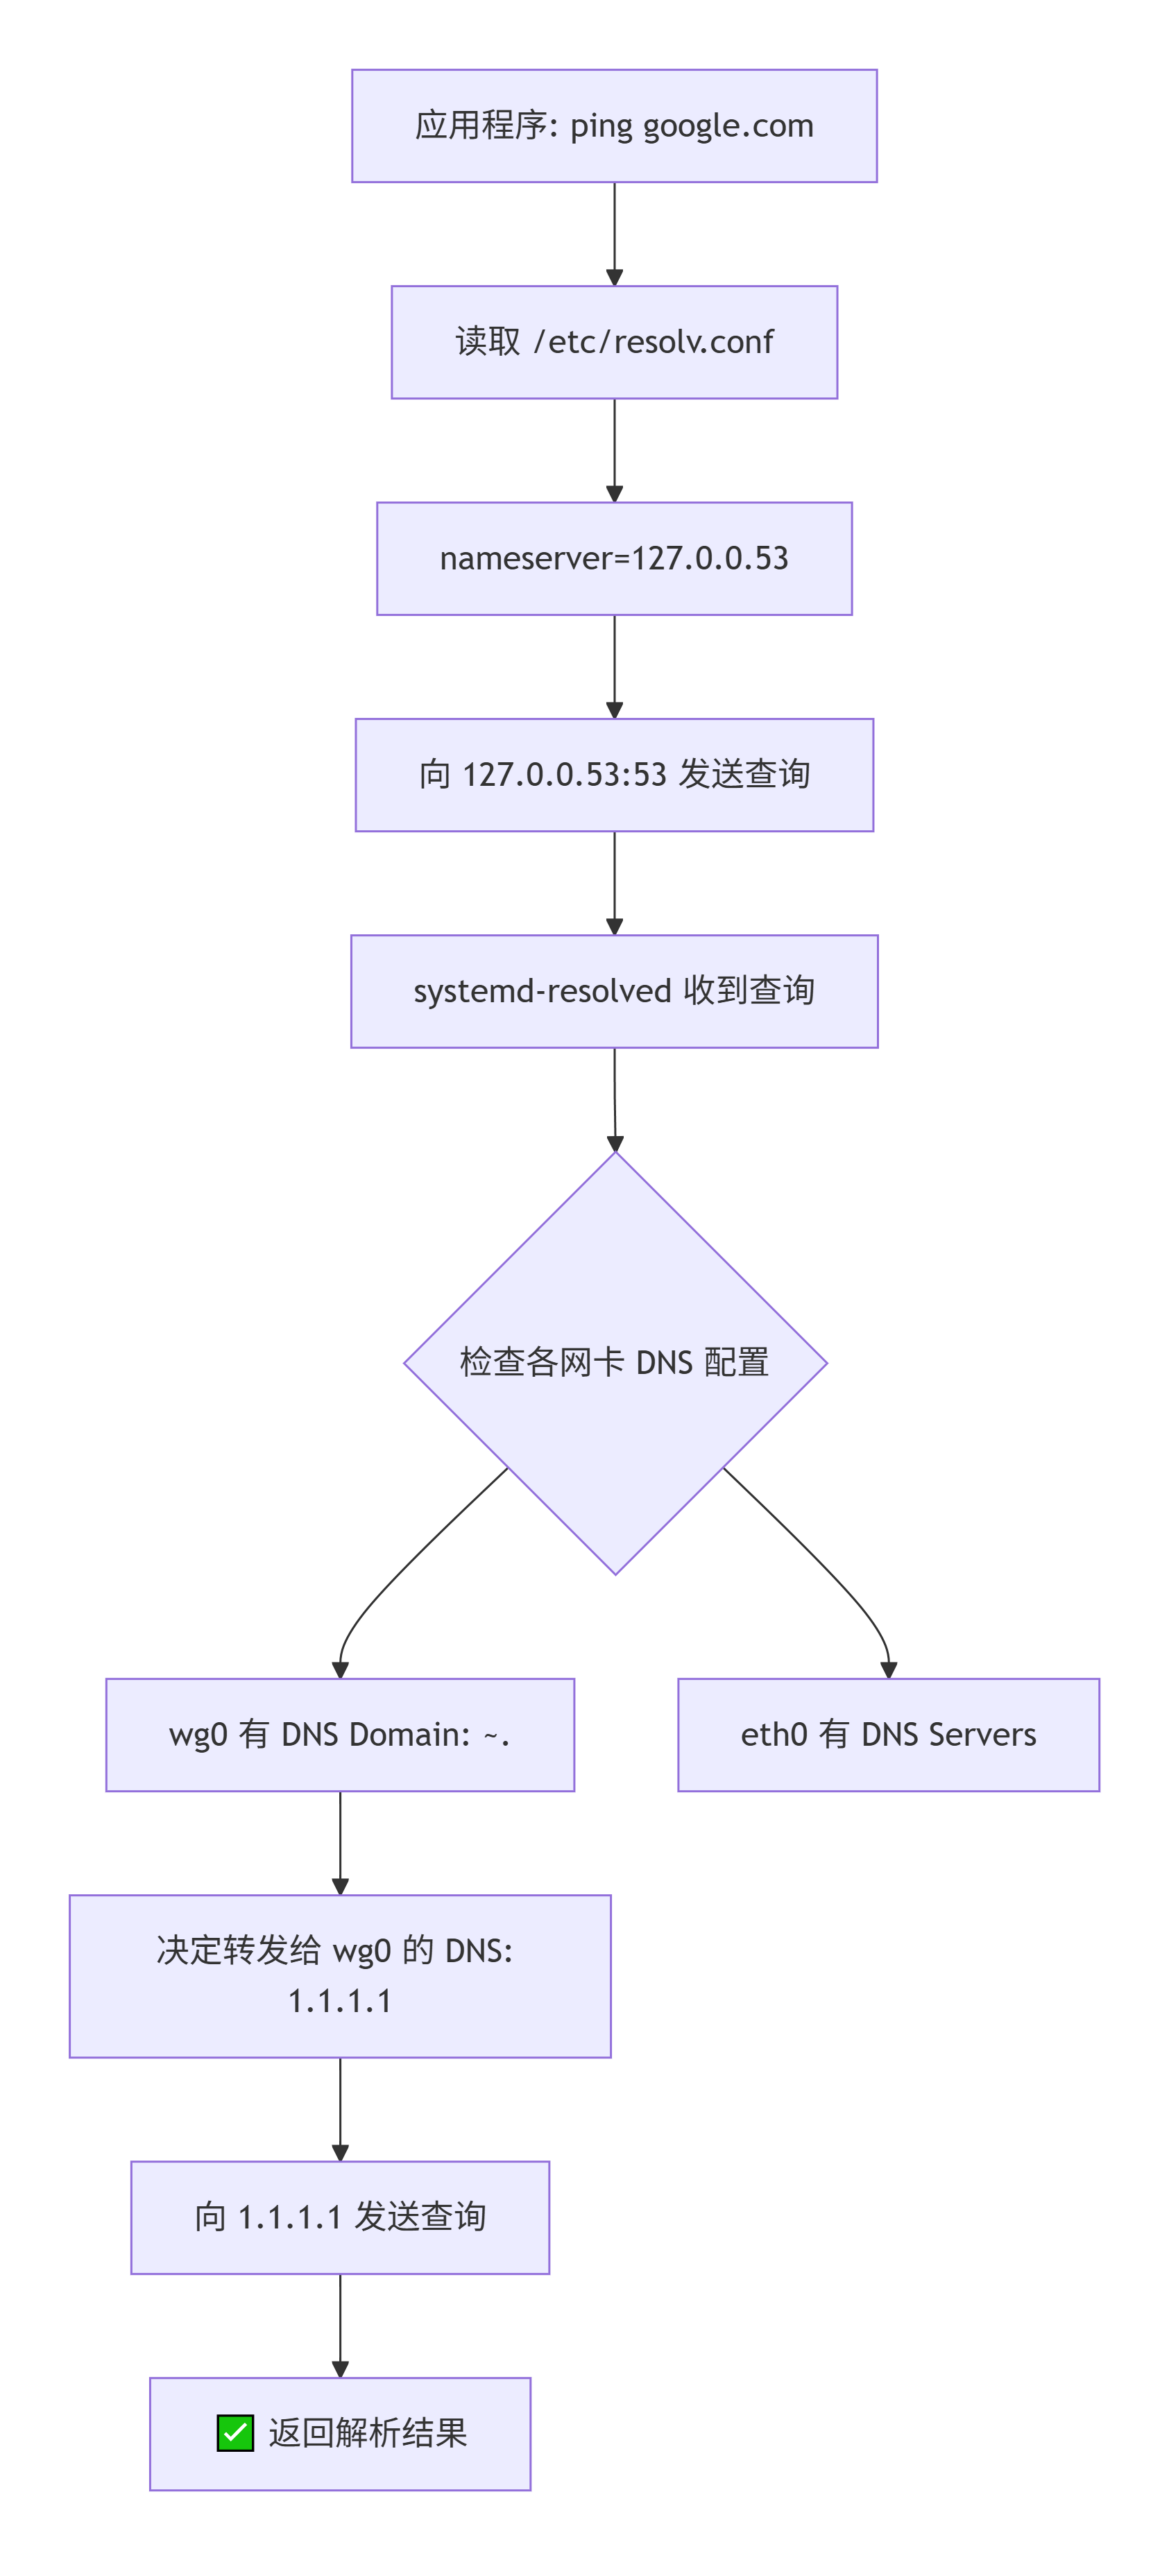
3.2 systemd-resolved 如何决定上游 DNS?
systemd-resolved 按以下逻辑决定将查询转发给谁:
- 检查网卡的 DNS Domain 配置
- 如果有
~.,该网卡处理所有域名 - 如果有
~example.com,只处理example.com域名 - 如果多个网卡都匹配,优先级按数字顺序(Link 编号小优先)
- 回退机制
- 如果没有任何网卡匹配,使用
Global配置 - 如果
Global也为空,使用系统默认 DNS
3.3 DNS 查询的完整路径
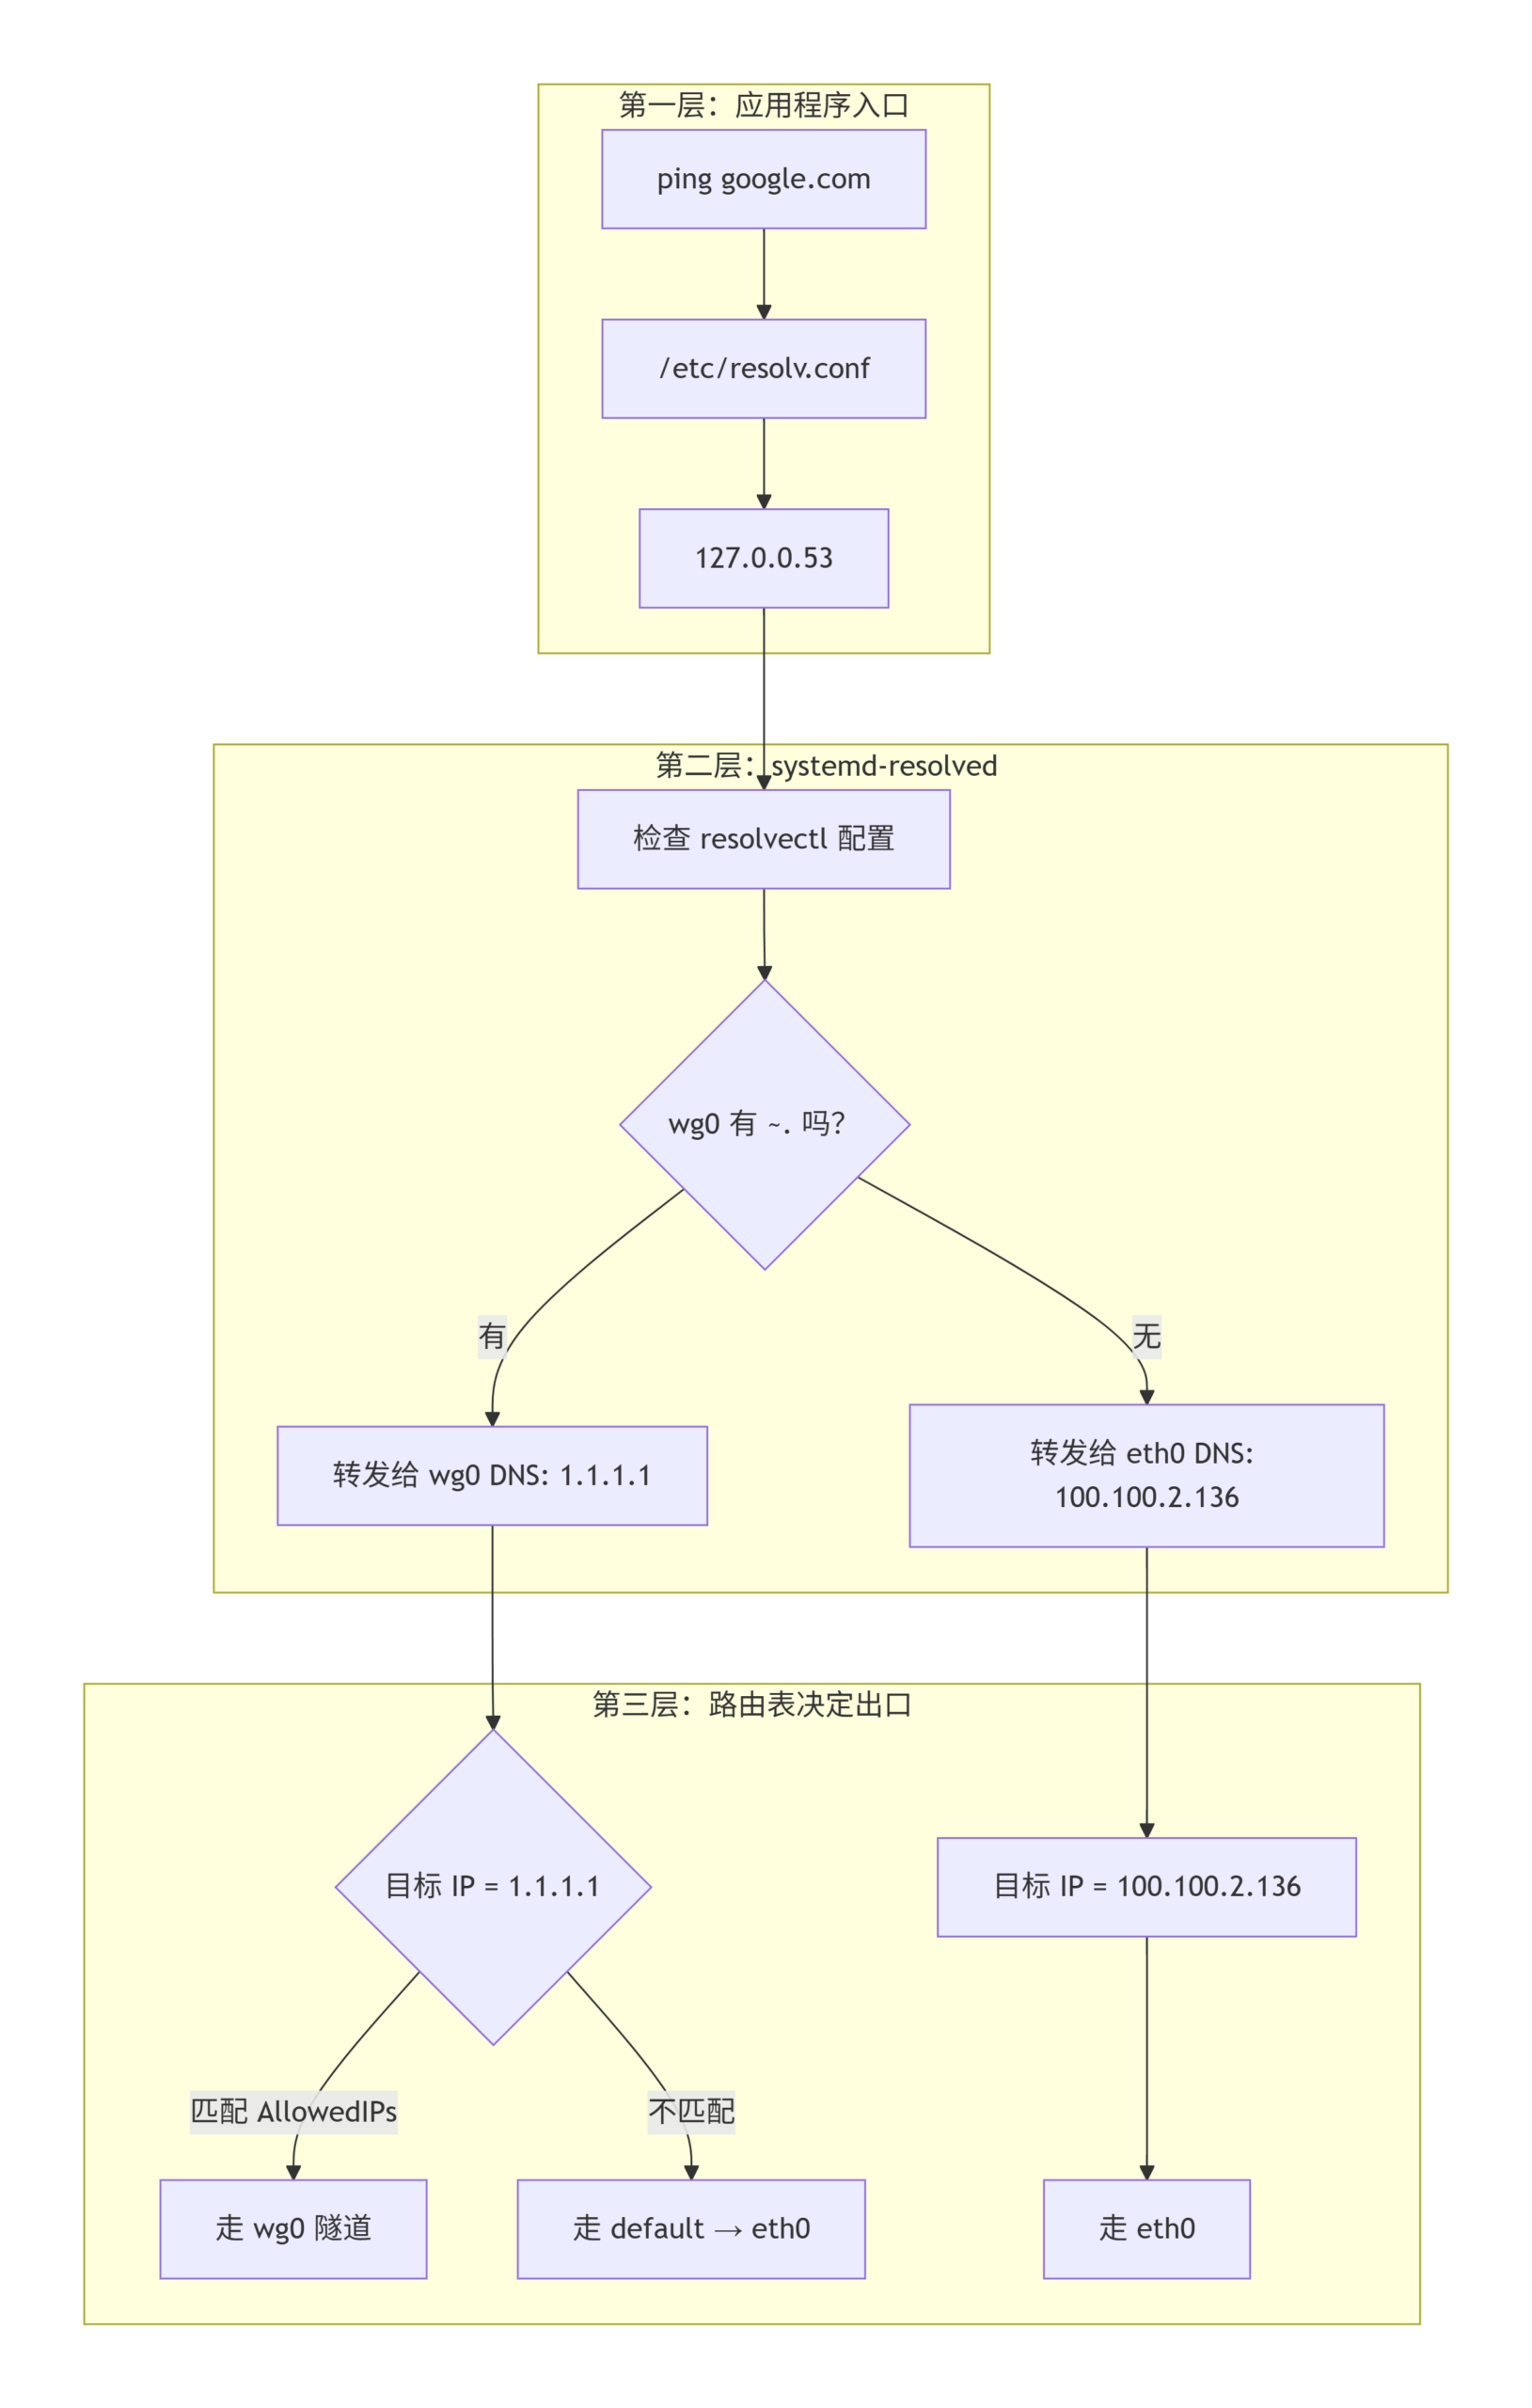
四、正确配置示例(WireGuard + DNS)
4.1 配置目标
让所有 DNS 查询走 wg0 的 DNS(1.1.1.1),并通过 wg0 隧道发出。
4.2 配置文件
# /etc/wireguard/wg0.conf
[Interface]
PrivateKey = xxxxxxxxxxxxxxxxxxxxxxxxxxxxxxxxxxxxxxxxxxx=
Address = 10.8.0.4/32, fdcc:ad94:bacf:61a4::cafe:4/128
MTU = 1420
DNS = 1.1.1.1, 2606:4700:4700::1111, 223.5.5.5, 2400:3200::1

[Peer]
PublicKey = xxxxxxxxxxxxxxxxxxxxxxxxxxxxxxxxxxxxxxxxxxx=
PresharedKey = xxxxxxxxxxxxxxxxxxxxxxxxxxxxxxxxxxxxxxxxxxx=
AllowedIPs = 1.1.1.1/32, 172.65.46.172/32, 10.8.0.0/24, fdcc:ad94:bacf:61a4::cafe:0/112
PersistentKeepalive = 25
Endpoint = wg.tanglinux.com:8082
关键配置:
| 配置项 | 值 | 作用 |
|---|---|---|
DNS = 1.1.1.1, ... | 四个 DNS 地址 | 告诉 systemd-resolved 用这些 DNS 服务器 |
AllowedIPs = 1.1.1.1/32, ... | 包含 DNS 地址 | 允许 DNS 查询流量走 wg0 隧道 |
两者缺一不可:
- 只有
DNS = 1.1.1.1没有AllowedIPs→ DNS 查询走 default 路由(eth0) - 只有
AllowedIPs没有DNS = 1.1.1.1→ 系统不知道用这个 DNS
4.3 验证结果
resolvectlGlobal
Protocols: -LLMNR -mDNS -DNSOverTLS DNSSEC=no/unsupported
resolv.conf mode: stub
Link 2 (eth0)
Current Scopes: DNS
Protocols: +DefaultRoute -LLMNR -mDNS -DNSOverTLS DNSSEC=no/unsupported
Current DNS Server: 100.100.2.136
DNS Servers: 100.100.2.136 100.100.2.138
Link 4 (wg0)
Current Scopes: DNS
Protocols: +DefaultRoute -LLMNR -mDNS -DNSOverTLS DNSSEC=no/unsupported
Current DNS Server: 1.1.1.1
DNS Servers: 1.1.1.1 2606:4700:4700::1111 223.5.5.5 2400:3200::1
DNS Domain: ~.输出解读:
| 字段 | 值 | 含义 |
|---|---|---|
wg0 Current Scopes: DNS | DNS | wg0 负责 DNS 解析 |
wg0 Current DNS Server | 1.1.1.1 | 当前实际使用的 DNS |
wg0 DNS Servers | 四个地址 | 配置的所有 DNS 服务器 |
wg0 DNS Domain | ~. | 所有域名都走 wg0 |
eth0 Current DNS Server | 100.100.2.136 | eth0 的 DNS(作为回退) |
4.4 验证 DNS 解析
# 测试 DNS 解析
dig @127.0.0.53 acme-staging-v02.api.letsencrypt.org

# 查看实际使用的 DNS
dig acme-staging-v02.api.letsencrypt.org | grep SERVER
# ;; SERVER: 127.0.0.53#53(127.0.0.53)

# ping 测试
ping acme-staging-v02.api.letsencrypt.org
# ✅ 成功
五、常见配置场景
5.1 场景一:单网卡(最简单的配置)
# 查看当前 DNS
resolvectl status eth0

# 设置 DNS
sudo resolvectl dns eth0 8.8.8.8 114.114.114.114

# 让所有域名走这个 DNS
sudo resolvectl domain eth0 "~."
5.2 场景二:VPN 分流(内网域名走 VPN,公网走本地)
# eth0:本地 DNS
sudo resolvectl dns eth0 100.100.2.136

# wg0:VPN DNS(只处理内网域名)
sudo resolvectl dns wg0 10.0.0.1
sudo resolvectl domain wg0 "~internal" "~corp"
这样 *.internal 和 *.corp 走 VPN DNS,其他走本地 DNS。
5.3 场景三:所有 DNS 查询走 VPN(你的配置)
在 wg0.conf 中配置:
[Interface]
DNS = 1.1.1.1, 2606:4700:4700::1111, 223.5.5.5, 2400:3200::1

[Peer]
AllowedIPs = 1.1.1.1/32, 10.8.0.0/24, ...
wg-quick up 自动执行:
resolvectl dns wg0 1.1.1.1 2606:4700:4700::1111 223.5.5.5 2400:3200::1
resolvectl domain wg0 "~."
结果:所有 DNS 查询走 wg0 的 1.1.1.1。
5.4 场景四:保留 VPN DNS 但不接管所有域名
# 去掉 ~.,只让特定域名走 wg0
sudo resolvectl domain wg0 "~example.com"
这样只有 example.com 走 wg0 DNS,其他域名走 eth0。
六、常用配置和管理命令
6.1 resolvectl 命令大全
# 查看所有网卡的 DNS 配置
resolvectl status

# 查看特定网卡的 DNS 配置
resolvectl status eth0
resolvectl status wg0

# 为网卡设置 DNS
sudo resolvectl dns eth0 100.100.2.136 100.100.2.138
sudo resolvectl dns wg0 1.1.1.1 223.5.5.5

# 为网卡设置域名规则
sudo resolvectl domain wg0 "~."          # 所有域名
sudo resolvectl domain wg0 "~example.com" # 特定域名
sudo resolvectl domain wg0 ""            # 清空

# 设置默认路由(优先级)
sudo resolvectl default-route wg0 true   # 优先使用 wg0
sudo resolvectl default-route wg0 false  # 不优先使用 wg0

# 刷新 DNS 缓存
sudo resolvectl flush-caches

# 清除网卡的 DNS 配置
sudo resolvectl dns wg0 ""
sudo resolvectl domain wg0 ""
6.2 查看 DNS 状态
# 查看完整的 DNS 状态
resolvectl status

# 查看 127.0.0.53 监听状态
ss -tuln | grep 127.0.0.53

# 查看服务日志
sudo journalctl -u systemd-resolved -n 20
6.3 测试 DNS 解析
# 通过 systemd-resolved 解析(走 127.0.0.53)
dig @127.0.0.53 google.com
nslookup google.com 127.0.0.53

# 直接指定 DNS 服务器解析(绕过 systemd-resolved)
dig @1.1.1.1 google.com
dig @100.100.2.136 google.com

# 查看实际走哪个 DNS
dig google.com | grep SERVER

# ping 测试
ping google.com
七、常见问题排查
7.1 排查流程
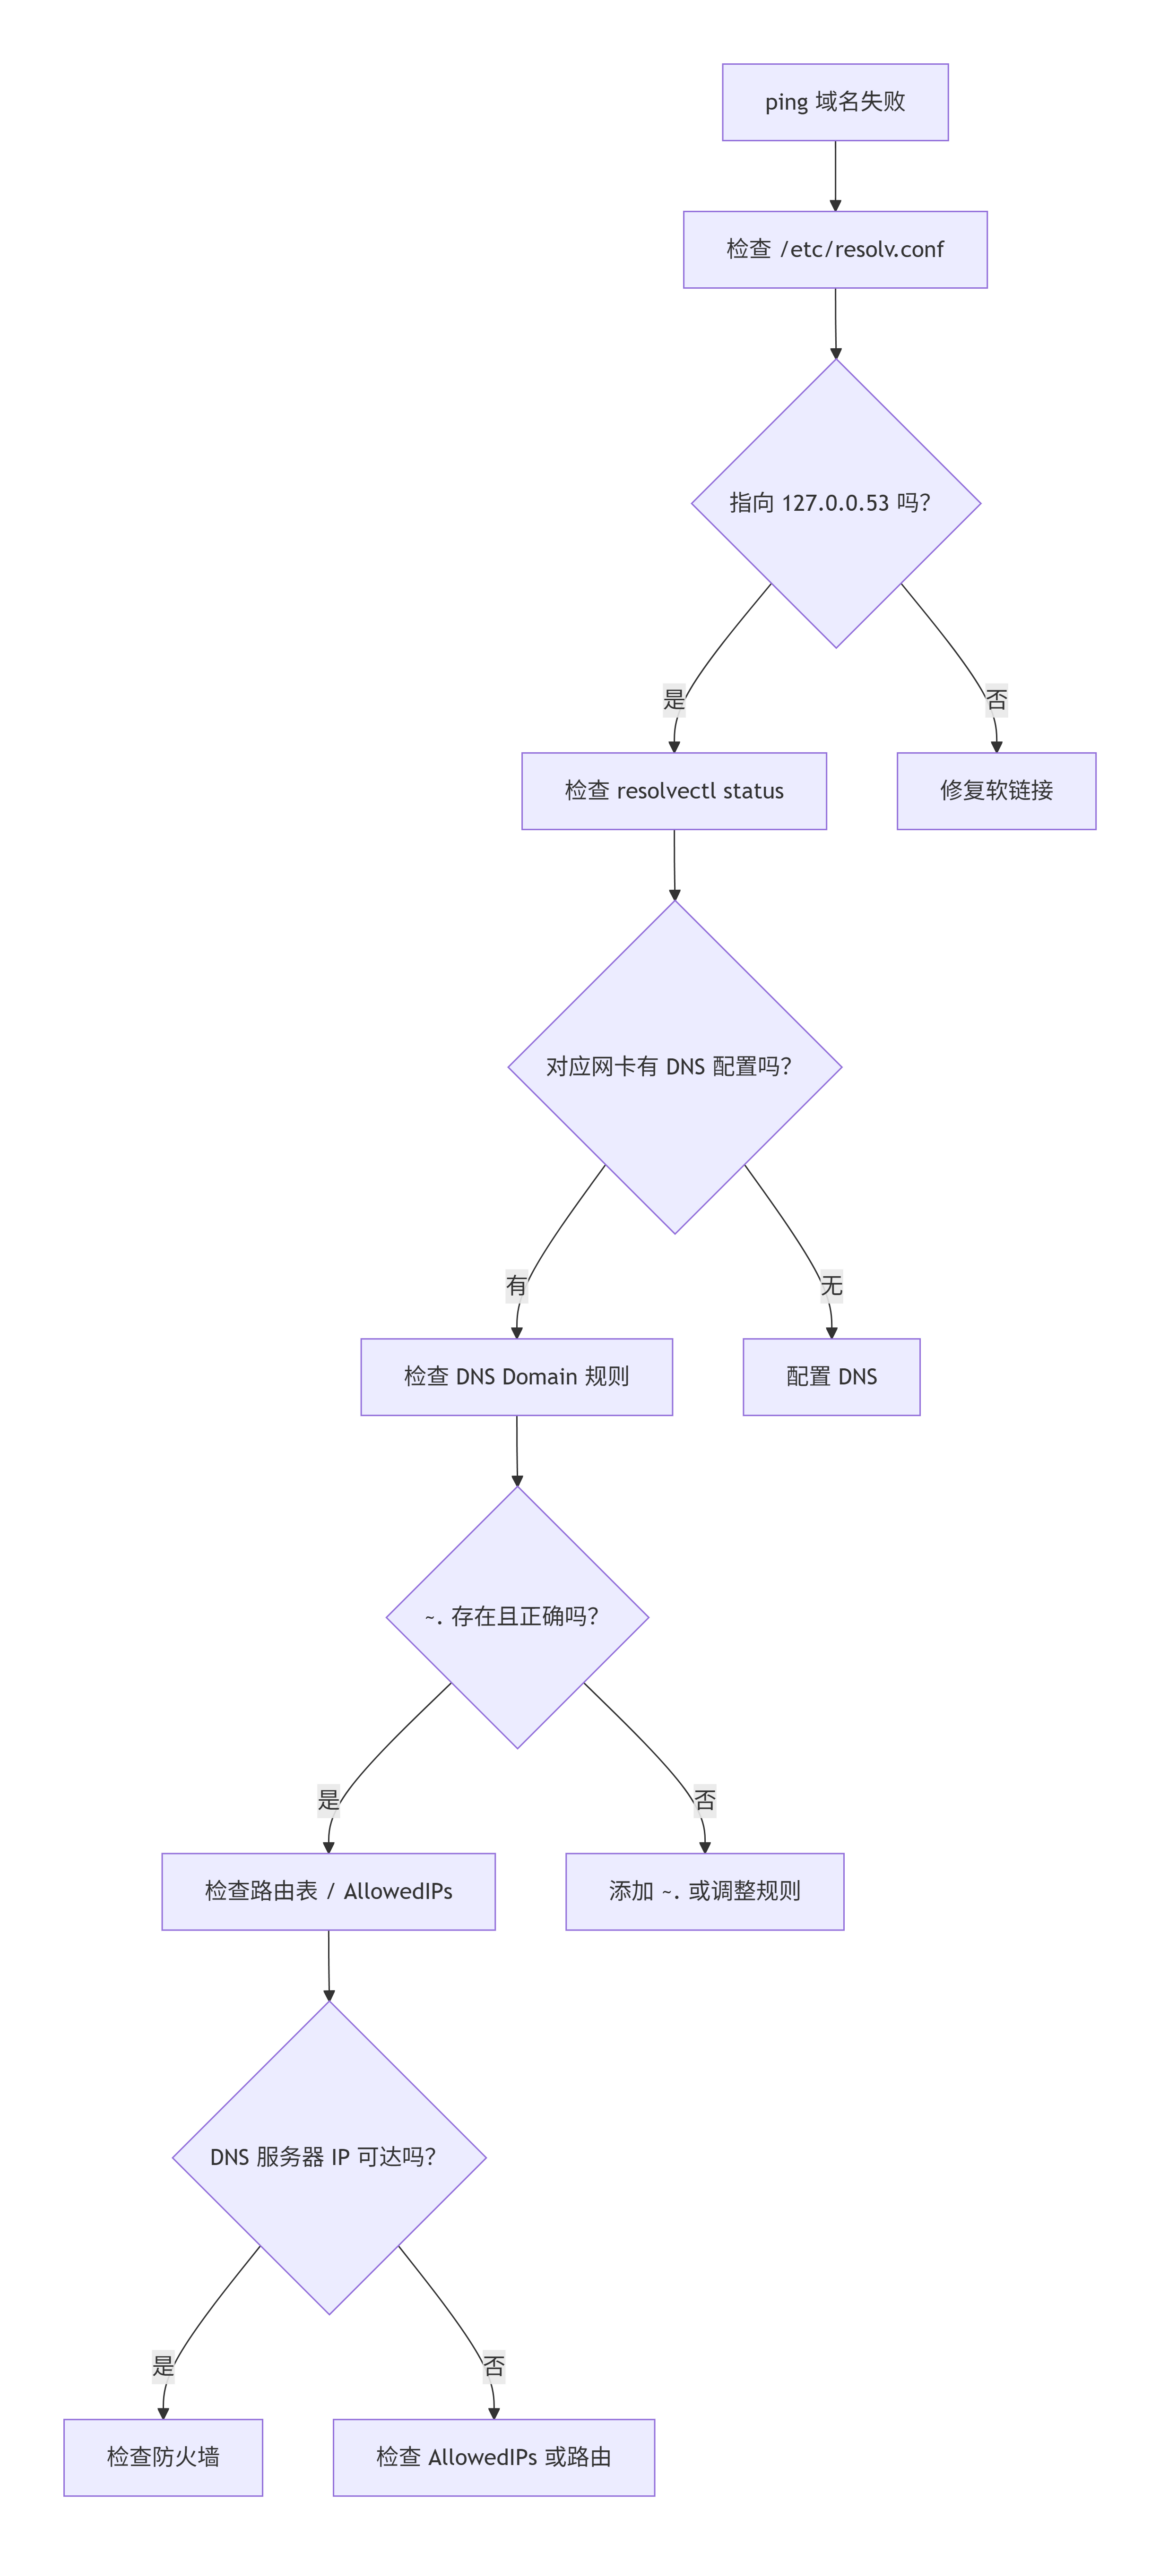
7.2 常见问题
| 问题 | 可能原因 | 解决方案 |
|---|---|---|
dig @127.0.0.53 超时 | systemd-resolved 未运行 | sudo systemctl restart systemd-resolved |
| DNS 配置不生效 | /etc/resolv.conf 不是软链接 | sudo ln -sf /run/systemd/resolve/stub-resolv.conf /etc/resolv.conf |
| VPN DNS 不工作 | DNS Domain 未设置 | sudo resolvectl domain wg0 "~." |
| DNS 查询走错网卡 | 路由表或 AllowedIPs 问题 | ip route 检查路由 |
| 配置重启后丢失 | wg-quick 覆盖 | 使用 systemd 服务或修改配置文件 |
| DNS 配置了但 ping 不通 | AllowedIPs 没包含 DNS 地址 | 在 AllowedIPs 中加入 DNS 服务器 IP |
7.3 修复 resolv.conf
如果 /etc/resolv.conf 被手动修改或损坏:
# 恢复为 systemd-resolved 管理
sudo rm -f /etc/resolv.conf
sudo ln -sf /run/systemd/resolve/stub-resolv.conf /etc/resolv.conf
sudo systemctl restart systemd-resolved
第八章:核心要点总结
8.1 关键概念
| 概念 | 说明 |
|---|---|
/etc/resolv.conf | 软链接,指向 127.0.0.53,不要手动编辑 |
127.0.0.53 | systemd-resolved 服务的本地监听地址 |
systemd-resolved | Ubuntu DNS 解析核心服务 |
resolvectl | 管理 DNS 配置的命令行工具 |
DNS Servers | 网卡关联的 DNS 服务器列表 |
DNS Domain | 决定哪些域名走该网卡 DNS |
~. | 匹配所有域名的特殊标记,由 wg-quick 自动添加 |
8.2 配置要点
| 要点 | 说明 |
|---|---|
| 不要编辑 /etc/resolv.conf | 它是 systemd-resolved 管理的软链接 |
| 用 resolvectl 查看配置 | resolvectl status 是唯一可靠的查看方式 |
| WireGuard DNS 需配合 AllowedIPs | DNS= 配置后,必须确保 DNS 地址在 AllowedIPs 中 |
| ~. 由 wg-quick 自动添加 | 在 [Interface] 中写 DNS= 就会自动生成 |
| DNS 也是网络流量 | 必须走路由表,受 AllowedIPs 和路由规则约束 |
8.3 一句话总结
Ubuntu 的 DNS 配置是一个两层结构:
/etc/resolv.conf指向本地127.0.0.53(systemd-resolved),由 systemd-resolved 根据各网卡的DNS Servers和DNS Domain规则转发给上游 DNS。真正的配置通过resolvectl管理,而非直接编辑/etc/resolv.conf。
附录一:传统方式 vs systemd-resolved
| 对比项 | 传统方式 | systemd-resolved (Ubuntu) |
|---|---|---|
| 配置文件 | /etc/resolv.conf 直接写 DNS | 指向 127.0.0.53 |
| 多网卡 DNS | 后覆盖前,混乱 | 各网卡独立管理 |
| 域名分流 | 不支持 | 支持 DNS Domain 规则 |
| 缓存 | 无统一缓存 | 统一缓存层 |
| mDNS/.local | 不支持 | 原生支持 |
| 配置方式 | 手动编辑文件 | resolvectl 命令 |
| 适合场景 | 简单单网卡环境 | 多网络/多 VPN 复杂环境 |
附录二:常用命令速查表
| 目的 | 命令 |
|---|---|
| 查看所有 DNS 配置 | resolvectl status |
| 查看网卡 DNS | resolvectl status eth0 |
| 设置 DNS | sudo resolvectl dns eth0 1.1.1.1 |
| 设置域名规则 | sudo resolvectl domain wg0 "~." |
| 清除 DNS | sudo resolvectl dns wg0 "" |
| 清除域名规则 | sudo resolvectl domain wg0 "" |
| 刷新缓存 | sudo resolvectl flush-caches |
| 重启服务 | sudo systemctl restart systemd-resolved |
| 查看监听 | ss -tuln | grep 127.0.0.53 |
| 检查软链接 | ls -l /etc/resolv.conf |
| 修复软链接 | sudo ln -sf /run/systemd/resolve/stub-resolv.conf /etc/resolv.conf |
附录三:你当前的配置状态
| 项目 | 值 |
|---|---|
| 操作系统 | Ubuntu 24.04 |
| 云平台 | 阿里云 ECS |
| eth0 DNS | 100.100.2.136 / 100.100.2.138 |
| wg0 DNS | 1.1.1.1 / 2606:4700:4700::1111 / 223.5.5.5 / 2400:3200::1 |
| wg0 DNS Domain | ~.(所有域名走 wg0) |
| wg0 Current Scopes | DNS |
| wg0 Current DNS Server | 1.1.1.1 |
| 配置状态 | ✅ 正常工作 |